Wednesday, March 4, 2015

How to PrintScreen on a Surface Pro 3

I switched over to using a Microsoft Surface Pro 3 regularly, and noticed the keyboard on the SP3's Type Cover is missing the PrintScreen button. So, how do you PrintScreen without a PrintScreen button?

The Surface Pro 3's PrintScreen button equivalent:
  • Press  Fn  Space  to capture the whole screen, or
  • Press  Alt  +   Fn  Space  to capture only the active window
Alternatives:
  • To quickly capture and save a screenshot of the whole screen, press and hold the Windows button on your screen bezel (not the Windows key on the keyboard) and then press the Volume Down button on the side of the device. This will save a screenshot to a Screenshots folder in your Pictures library. It didn't work the first couple times I tried it, but I think I was holding the Windows button for too long before pressing Volume Down. After a couple tries it was working reliably.
  • To select a specific part of the screen, try the Snipping Tool. It's a useful related utility that's been built into every desktop version of Windows since Vista. Touch Start and search for "snip". It lets you save, email, copy or even draw on your screen capture. But it doesn't have a Print feature and there's no "undo" if your drawing doesn't turn out!
  • To send a specific part of the screen to OneNote, double-click the purple button on the end of the SP3 pen -- in my experience, it's got to be a pretty quick double-click -- or alternately, use the "Screen Clipping" feature of the "Send to OneNote Tool" that may already be running be in your system tray. Either way, this should dim the screen and allow you to select an area to capture.
  • If all else fails, the On-Screen Keyboard (the Ease of Access one, not the Touch Keyboard that pops up from the taskbar) has a PrintScreen button available. Pressing Start and searching for "keyboard" brings it up as the first item for me.

Wednesday, December 5, 2012

Getting Started: Windows 8 with a Keyboard & Mouse

If you're just getting started with Windows 8 or Windows Server 2012, these few tips will make it much easier to jump in and move around.  (This focuses on the keyboard/mouse setup; if you’re using a touch interface, it’s worth learning Windows 8 gestures, which aren't covered here).
  1. How Do I Shut Down?!?  Move your cursor to the bottom-right corner of the screen.  Icons will appear along the right side of your screen. Click the gear icon for “Settings”, then click “Power” and “Shut down”.   Yes, that’s ridiculously hidden.  Or, just pressing the physical Power button on your computer may work.
    Power user tip: you can make your own Power button on the taskbar.
    UPDATE: In Windows 8.1, you can simply right-click on the Start button and select an option from the "Shut down or sign out" menu.
     
  2. Where’s my Start Button?  Move your cursor to the bottom-left corner of the screen to show the Start Button.  Or, press the Windows key on your keyboard.
    Power user tip: you can make your own permanent Start button on the taskbar.
    UPDATE: Windows 8.1 brings the Start button back to the taskbar.
     
  3. Where is _____?  To easily search, press the Start button and start typing.  Search results come up as you type. If you don’t see what you’re looking for, check other categories on the right (Apps, Settings, Files, etc.)
     
  4. “Metro” or “Modern UI” Apps are the full-screen apps you run from the Start Screen.  There are a few things to know working with them.  While running one,
    • Right-click anywhere to bring up an app-specific toolbar.
    • App-specific settings can be accessed by moving your cursor to the bottom-left corner of the screen, then clicking the gear icon that appears above.
    • To close an app, move your cursor to the top of your screen, then click-and-drag it all the way down to the bottom of the screen.  If you don't close them, they stay open but semi-suspended in the background.
    • To dock an app on a side of the screen, move your cursor to the top of your screen, then click-and-drag it to one edge of the screen or the other.  This will let you work with multiple apps side-by-side (including the desktop) at the same time.
    • To show which “Modern UI” apps are running, move your cursor to the bottom-left corner of your screen.  Don’t click the Start button, but instead move your cursor up along the left edge of your screen (if nothing happens, you’re not running any).
Got any other essential “Getting Started” tips?  Add your own in the comments below.


Monday, November 12, 2012

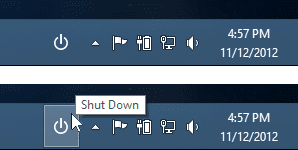
How to Create a Power Button in Windows 8

When getting started with Windows 8, one of the most confounding things is figuring out how to Shut Down.  Even after using it awhile, it still seems to take too many steps: bring up Charms, hit Settings, hit Power, hit Shut Down.

Previously I posted a way to create a permanent Start Button in Windows 8, using only built-in Windows features.  After playing around with it some more, I found you can do something similar to create a Power button.

Once it’s set up, hitting one button on the taskbar will bring up Windows’ Shut Down dialog, from which you can Sleep, Restart, Shut Down, etc.


How to Make a Power Button in Windows 8:

  1. In your Documents folder, create a new folder called Toolbars.  Place the icon of your choice inside.  I used this one (right-click link and select "Save As...").
     
  2. Start Notepad.  Copy and paste in this line of code:

    CreateObject("WScript.Shell").SendKeys "%{F4}"

    Save the file in that same Toolbars folder. Call it “ShutDown.vbs”.
     
  3. Inside that Toolbars folder, create a new subfolder called Shut Down.
     
  4. Right-click on the ShutDown.vbs file and select Copy.  Open the Shut Down folder, right-click and select “Paste Shortcut”.  Rename the shortcut “Shut Down”.  Then right-click the shortcut, select “Properties” and click the “Change Icon…” button.  Select the icon from Step 1.
     
  5. On an empty part of the Windows Taskbar, right-click and de-select “Lock all taskbars”.
     
  6. On an empty part of the Windows Taskbar, right-click, select “Toolbars”, then “New Toolbar…”  Select the Shut Down folder from Step 3.
     
  7. By right-clicking your new Shut Down toolbar, you can customize the way it looks.  De-select “Show Title” and “Show Text”, and under the “View” menu, select “Large Icons”.
     
  8. Reposition and resize your Shut Down toolbar as you see fit, then right-click the taskbar and re-enable “Lock all taskbars”.
So basically this creates a script that presses Alt-F4, which is Windows’ key combination for closing whatever window has focus.  Since the button you press is on the taskbar, the taskbar gets focus and it assumes you want to close Windows itself.

If you found this useful or have any tips for improving it, leave me a note here!

Friday, October 26, 2012

How to get the Windows 8.1 Start Button now, for free!

Those new to Windows 8 might find it disconcerting that there's an invisible "hot corner" that triggers the Start screen in Windows 8, rather than the permanent button in previous versions. Or if you use a mouse and multiple monitors, it can be hard to move the cursor exactly to the bottom-left corner of the screen without overshooting into into the next monitor.

With a few minutes of work, you can set up a permanent button in Windows 8 using built-in Windows features, without any third-party software. (This doesn't bring back the old Start menu; it just gives a sizable,  permanently-visible on-screen target to hit when accessing the Start screen.)


How to Make a Start Button in Windows 8:
  1. In your Documents folder, create a new folder called Toolbars. Place the icon of your choice inside. (I used this one, pictured above.)
     
  2. Start Notepad. Copy and paste in this one line of text:

    CreateObject("WScript.Shell").SendKeys "^{ESC}"

    Save the file in that same Toolbars folder. Call it "Start.vbs".
     
  3. Inside that Toolbars folder, create a new subfolder called Start Button.
     
  4. Right-click on the Start.vbs file and select Copy. Open the Start Button folder, right-click and select "Paste Shortcut". Rename the shortcut "Start". Then right-click the shortcut, select "Properties" and click the "Change Icon…" button. Select the icon from Step 1.
     
  5. On an empty part of the Windows Taskbar, right-click and de-select "Lock all taskbars"
     
  6. On an empty part of the Windows Taskbar, right-click, select "Toolbars", then "New Toolbar…" Select the Start Button folder from Step 3.
     
  7. By right-clicking on your new Start Button toolbar (not on the button itself), you can customize the way it looks. De-select "Show Title" and "Show Text", and under the "View" menu, select "Large Icons".
     
  8. Drag your Start Button toolbar all the way to the left of the taskbar (or place it as you see fit), then right-click an empty spot on the taskbar and re-enable "Lock all taskbars".
For multi-monitor setups, you'll notice you can only add toolbars to your main monitor's taskbar. Also, just like with pressing the physical Windows button on your keyboard or tablet, this new Start button will make the Start screen appear on whichever monitor it was on last, not necessarily on your main monitor.

Update 5/13/2013: This works great on Windows Server 2012 as well! (For those not familiar, Windows Server 2012 has an interface similar to Windows 8, but it's geared toward server machines, as the name implies.) At work I've been administering some servers via Remote Desktop, which I almost never run full-screen. The keyboard's Windows button only activates the Start screen on my local PC. So adding a Start button like this gives me a solid target to aim for with the mouse.

Update 6/10/2013: Apparently the Start button in the upcoming Windows 8.1 looks virtually identical to this, and also brings up the Start screen. So, you can effectively get one feature of Windows 8.1 right now, for free!